
There are several advantages to changing the DNS servers. They include faster loading, greater security, and bypassing blocked sites.
When we hire a broadband provider, our internet will automatically work with their DNS numbers, which makes it easy to use but can end up hurting the performance or availability of what you are looking for. But with so many DNS servers available, you have options when you want to change your internet service.
In this tutorial, i will guide you in configuring name resolution addresses in Windows 7. This will improve your security and the Performance of your internet. But first:
What is a DNS Server?
A DNS server is a computer that translates domain names into IP addresses. When you type a domain name into your web browser, the browser contacts the DNS server to get the website’s IP address.
DNS servers are provided by your ISP or a public DNS service such as Google Public DNS or Cloudflare DNS.
How do I change my DNS server settings?
To change your DNS server settings in Windows, follow these steps:
- Open the Control Panel.
- Click on Network and Internet.
- Click on Network and Sharing Center.
- Click on Change adapter settings.
- Right-click on your active network connection and select Properties.
- Select Internet Protocol Version 4 (TCP/IPv4) and click on Properties.
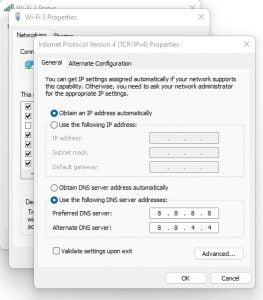
- Select Use the following DNS server addresses and enter the IP addresses of the DNS servers you want to use. You can use multiple DNS servers, separated by commas. For example, 8.8.8.8, 8.8.4.4 (Google Public DNS). If you want to use Cloudflare DNS, you can use 1.1.1.1, and 1.0.0.1
Now, if you Do not want to use Google Or Cloudflare DNS, other options are available based on your requirements.
OpenDNS
OpenDNS is used by more than three thousand corporations and more than thirty million people. It helps keep your internet connection stable and can help protect against phishing.
- Following the tutorial above, change your computer’s IPv4 addresses to 208,67,222,222 and 208,67,220,220, respectively, to start using.
Comodo Secure DNS
For those looking to browse safely and who won’t be tricked by a malicious website, Comodo Secure DNS is the most recommended option. It blocks sites considered malicious or even restricts certain operations asked by them.
- Following the tutorial above, change your computer’s IPv4 addresses to 8.26.56.26 and 8,20,247,20, respectively, to start using.
NextDNS
NextDNS is a DNS service that offers many features to make your browsing experience safer and faster. One of the most important features is its ability to block malicious websites. This way, you can avoid accidentally visiting a site that could infect your computer with malware.
NextDNS also offers other features, such as parental controls and privacy protection. You can use it on any device that connects to the internet, including computers, smartphones, and routers.
- To use NextDNS, first, you need to register on their Website and get the DNS IP Address.
- Then, follow the same steps given above to change your NextDNS.
Why should I change my DNS server settings in Windows 7?
You might want to change your DNS server settings in Windows 7 for several reasons.
- The first reason is if you want to improve your internet speed. If your current DNS server is slow, changing to a faster one can make a big difference.
- Another reason to change your DNS server settings is if you want to improve your online security. Some DNS servers offer better protection against malware and phishing attacks than others.


Is it real that if I change my DNS, no one would be able to identify my true location?
No, thats Wrong. Your Location will be still visible. To hide your location you can use good VPN