

Better internet speed, improved stability, and stronger security are among the main reasons people choose to change the DNS server on their computer or mobile device.
The challenge is that each platform-routers, Windows PCs, Macs, iPhones, Android phones, Chromebooks, and others-handles DNS settings differently. That can make the process confusing, especially for less experienced users.
To make things easier, All Tech Nerd has put together a complete, step-by-step guide to changing DNS settings on virtually any device or operating system, helping you get it done quickly and without frustration.
How to Change DNS
How to change DNS on the router
Changing the DNS settings on the router means your entire network will use the server you set. PCs, smartphones, tablets, consoles, set-top boxes, smart lamps… It doesn’t matter which device: if you change DNS on the router, everyone will automatically use it.
It’s the kind of thing that will save you from doing this configuration on every single device connected to the network. And if you regret it, going back is even easier.
To change the DNS on your router, you will first need to access its configuration interface. If you don’t know how to do this, you can usually type the address 192.168.0.1 into your browser and enter your administrator credentials.
If that doesn’t work or you don’t know the administrator credentials, look at the bottom of your router: there is usually a label with instructions on how to proceed. If not, consult the manual that came with your device.
Now that you are in the configuration interface, you will likely find the DNS server configuration menu in the WAN section of the router. If it is not there, or there is no WAN section, look for that option in the LAN, DHCP or Internet sections. If you still can’t find the correct option, refer to your equipment manual or search Google to configure a new DNS on your specific router model.
If none of that works, or if you want to set a DNS server for each device individually, here’s how.
To change DNS in Windows, you’ll have to access the operating system’s Control Panel, since in Windows 10 there is still no way to do this from the Settings menu.
- Open the Start Menu, type “Control Panel,” and click the option.
- In the window that opens, click on “Network and Internet,” then “View network status and tasks,” and finally, “Change adapter settings” on the left side.
- Now in the “Network Connections” window, right-click on the connection you want to configure a new DNS and select “Properties.” On the “Network” tab, scroll down the “This connection uses the following items” list and choose “IP Protocol Version 4 (TCP/IPv4).” Now click on “Properties” below.
In the new window that opens at the bottom, select the option “Use the following DNS server addresses” and provide the address of the DNS servers you want to use. Once this is done, confirm the changes in all windows by clicking “OK.”
It is worth remembering that this same procedure can be used to define a new DNS server for IPv6 connections by simply selecting IPv6 from the previous list. It is also important to note that the process must be repeated for all Windows PC connections, including wireless, wired, and virtual connections.
Ready! To ensure everything works correctly, it is recommended to restart the machine to clear the DNS cache or follow the step-by-step instructions provided by Microsoft to do so from the Command Prompt.
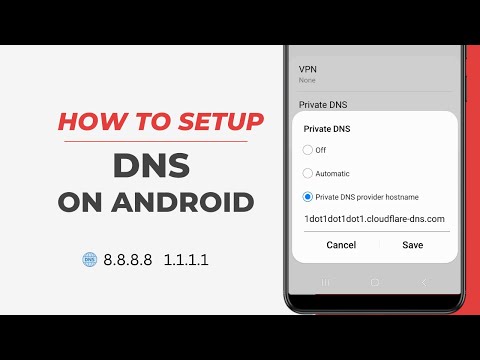
Change DNS on Android
Changing DNS on Android smartphones and tablets is relatively simple on the latest Android Versions. You need to make a few changes.
- Open Android Settings.
- Click Networks & Internet
- At the bottom, you will see “Private DNS.”
- You will have three Options: Off, Automatic (Google DNS), Custom (https://1dot1dot1dot1.cloudflare-dns.com)
You can also use apps like DNS Changer and WARP.
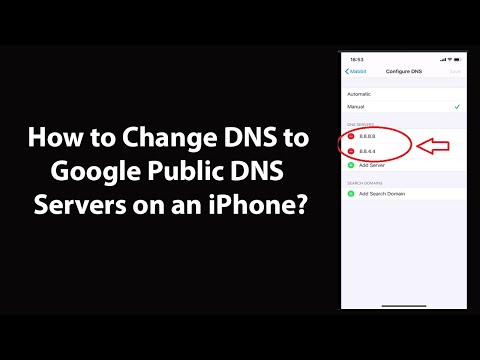
Change DNS on iPhone or iPad
Like Android, iOS does not allow you to set a system-wide DNS server and requires the user to configure it individually for each Wi-Fi network the iPhone or iPad connects to.
To change DNS on your iPhone or iPad, go to “Settings” and “Wi-Fi.” Next to the Wi-Fi network, there is an “i” button on the right. Tap it, then scroll until you find the “Configure DNS” option. Select it.
On the new screen, choose the “Manual” option, then delete the DNS addresses you do not want to use by tapping the red button to the left of each item. After cleaning, tap “Add Server,” then enter the address of the new DNS you want to use. Realise that you can define both.
Once you’ve added your preferred DNS servers, confirm the changes by tapping “Save” at the top right. Ready!
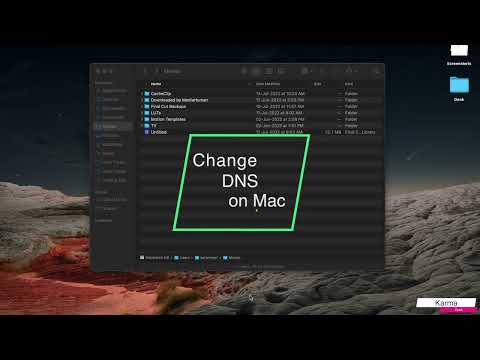
Change DNS on Mac
To change the DNS server your Mac uses, go to “System Preferences” > “Network”. In the window that opens, select the network adapter on the left that will receive the new DNS configuration, then click the “Advanced” button.
In the advanced settings window, click on the “DNS” tab and then on the “+” button in the lower right corner to enter the addresses of the DNS servers you want to use on your Mac – and note that you can use either IPv4 or IPv6 addresses. As you add new servers, they will appear in the left-hand listing. Now, confirm all changes by clicking “OK.”
To ensure your Mac uses the new DNS servers you’ve set, restart your Mac or clear your DNS cache using the walkthrough provided by Apple.
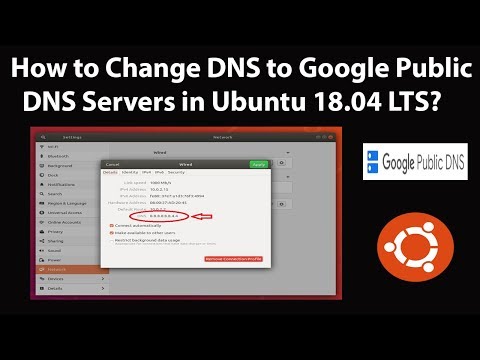
Change DNS in Ubuntu
There are two ways to change DNS in Ubuntu: the graphical interface or the Terminal. As I’ve shown all the changes using the system’s interface, let’s continue this way in Ubuntu 18.04 LTS.
Go to “Settings” in your Ubuntu installation and then to “Network”. When you open the network settings, you will likely see a list of available networks, including the one you are connected to. Click the configuration button next to the name of the one you are connected to.
In the new window that opens, click the “IPv4” tab, locate the “DNS” field, disable the “Automatic” switch, and enter the DNS server address you want to use. If you want to use multiple servers, separate their addresses with a comma.
Okay, now confirm the changes to use the new DNS server on your Ubuntu.
As there are many Linux distros, it’s best to consult their official website or the community if you can’t change the DNS yourself.
Change DNS on Chromebook
Changing the DNS server on the Chromebook is relatively easy, but, as with iOS and Android, Chrome OS doesn’t allow you to set a system-wide global DNS server. This means that you must make the following adjustment for each network you connect to.
On your Chromebook, go to “Settings” > “Network” and click on the name of the network you are connected to.
Select the “Network” subsection and find the “Name servers” area. Now choose either the option “Google name servers” if you want to use Google’s public DNS or “Custom name servers” to define any other DNS server.
If you choose the second option, enter the IP addresses of the DNS servers you want to use. Confirm the changes and repeat the procedure for each network your Chromebook connects to.
And that’s it! You may have noticed that all systems and devices offer a network configuration section where we can set the addresses of the new DNS servers. If the device you use is not in this guide, follow this tip, and you will surely find the option. As a last resort, consult the device manual or the internet for help.
- How to change DNS in Windows
- Fix DNS_probe_finished_nxdomain error in Google Chrome
- How to Adguard DNS


