
In a gaming landscape increasingly focused on digital distribution, the standard HD included with the PlayStation 4 may not always suffice. Most models available come with 500 GB of internal storage, which can be ample for some users. However, those who desire multiple titles installed or engage in resource-intensive games like the Call of Duty franchise might find the storage capacity lacking.
Consequently, upgrading the HDD to a larger version or seeking enhanced speed through an SSD becomes a consideration. Alternatively, you may find yourself needing to replace a faulty hard drive. Fortunately, performing these tasks on the PlayStation 4 is straightforward, involving a few steps and manageable tasks.
What do you need to change to the PS4 HDD?
To successfully carry out the process, you will need two essential tools: a Phillips screwdriver with a preferably long tip and a USB flash drive.
The screwdriver is used to remove the existing HDD from the console tray and install the new one, while the flash drive (which can also be replaced by an external hard drive) is used to back up the console’s data and install the operating system on the new disk.
During the process, it is possible to transfer installed games to the new console as long as the account from which they were downloaded is also available on the new console.
Additionally, videos, screenshots, and saved games can be stored on the flash drive, and if you are a PlayStation Plus subscriber, you can also store them in the cloud.
The same flash drive or external hard drive can be utilized for both the backup and reinstallation tasks of the operating system, provided that it is compatible with the PS4 and formatted in FAT32. A storage device with ample space is advisable to accommodate all the files without issues.
Which HDs work on PS4?
The PlayStation 4, regardless of its version, utilizes 2.5-inch SATA III hard drives, which are the same size commonly found in laptops. The console supports hard drives with up to 4 TB capacity, whether solid-state drives (SSDs) or mechanical drives.
When considering mechanical drives, it is important to pay attention to the revolutions per minute (RPM), with Sony recommending using components ranging from 5,400 to 7,200 RPM.
Most models available on the market are compatible with the console if they meet the above-mentioned specifications. Choosing hard drives from reputable brands that offer reliable and high-quality products is advisable. This ensures a smooth experience with the constant usage of the PS4 for gaming, game downloads, and file deletion without encountering any potential issues in the future.
How to back up PS4?
If you wish to back up your data and save games on the console before proceeding with the process, you can follow the steps below:
- Insert the flash drive into the console;
- Access the Settings menu and, in the System option, select “Backup and Restore”;
- Select Backup and select the data you want to save;
- Give the file a name and select Backup. Wait for the end of the process to remove the flash drive with the saved data.
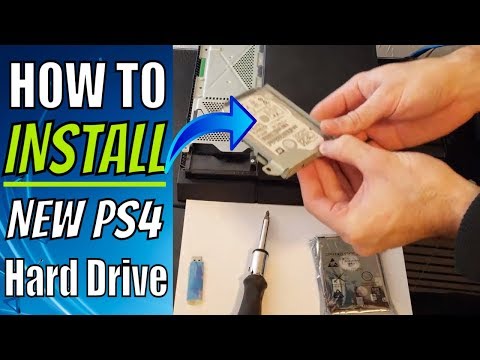
How to change PS4 HD?
The process of replacing the console hard drive is simple, involving the removal of a side cover and the drawer that contains the component. However, it is different in each video game version, so first of all, it is important to check which one is yours and follow the corresponding steps.
Look at your device’s serial number and also the format to find out what your PlayStation 4 model.
How to change PS4 Fat HDD?
- Turn off the console and disconnect all cables, including HDMI and electricity, and any other connected accessories;
- Place the console on a table or flat surface, facing forward;
- Locate the glossy cover on the left side, and apply light pressure with your hands, sliding the panel to the left until it detaches and moves about 7 mm;
- Carefully lift the panel, pulling the entire piece upwards;
- Find the HD drawer, which will be right in front of you. Loosen the large screw on the left and remove the piece to the front;
- The drawer will have four screws, two on each side. Remove them all to remove the HD and, when placing the new one in the same position, screw them again;
- Insert the drawer again and secure the large screw;
- Attach the top panel and gently push it to the right towards the console’s center LED until you hear a click.
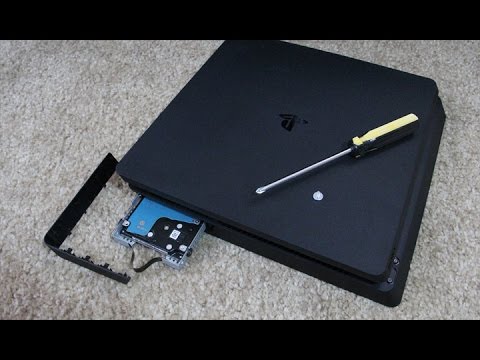
How to change PS4 Slim HD?
- Turn off the console and disconnect all cables, including HDMI and electricity, and any other connected accessories;
- Place the console on a table or flat surface, facing away;
- On the back of the console, locate the HD cover on the right, and pull it in the same direction lightly until it releases;
- Loosen the screw on the back of the device to release the drawer, which can be removed from the side;
- The drawer will have four screws, two on each side. Remove them all to remove the HD and, when placing the new one in the same position, screw them again;
- Insert the drawer again and secure the large screw at the back;
- Position the cover and carefully fit it.
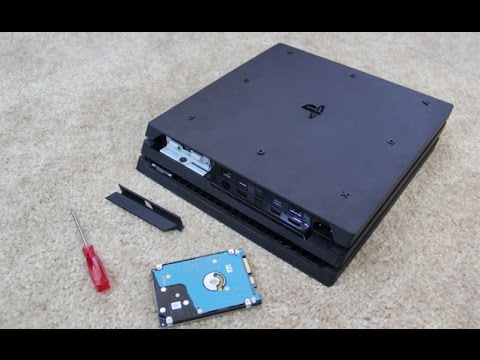
How to change PS4 Pro HD?
- Turn off the console and disconnect all cables, including HDMI and electricity, and any other connected accessories;
- Place the console on a table or flat surface upside down;
- Locate the HD cover next to the network cable connection, and pull it to the left (there may be a sticker on the protector, which can be removed without voiding the warranty);
- Loosen the big screw on the console body and pull the HD drawer;
- The drawer will have four screws, two on each side. Remove them all to remove the HD and, when placing the new one in the same position, screw them again;
- Insert the drawer again and secure the large screw to the PS4 body;
- Position the cover on the back of the console and carefully attach it.
How to reinstall PS4 OS
After replacing the HD, you must reinstall the console firmware, which is the same for all versions. It can be downloaded from Sony’s official website by following these steps to get the file recognized:
- Connect the USB flash drive or a compatible external HD to the computer (it must be formatted in FAT32);
- At the root of the device, create a folder with the name PS4 and, inside it, another called UPDATE (both must be in capital letters);
- Go to the Sony website and download the file from the “PS4 console reinstall file” button;
- Save the downloaded file, which is about 1 GB, in the UPDATE folder;
- Connect the USB flash drive or external HD to the console;
- Start the video game in Safe Mode, keeping the power button pressed and only releasing it when it emits two beeps;
- Connect the controller by cable and select the option “Reinstall system software”;
- Choose “Update from USB storage device” and confirm for the installation to take place.
After installation, the PS4 can create accounts, download games, and install titles on a disc. If you have a backup to restore, do so through the settings menu, in the option “Management of saved data from applications,” selecting the USB device, and copying the files to the new HD.


