
Windows accounts have been a staple feature of Microsoft operating systems for many years, providing a solution for scenarios where multiple individuals share the same computer or when different profiles are needed within a team environment with specific programs.
Typically, Windows accounts are created during the initial setup of the computer when personal information is configured. However, there may be instances where you need to change the username associated with an account.
Fortunately, Windows 11 offers various methods to accomplish this, whether you’re using a local account or a Microsoft account.
Change the Username in Windows 11
If you’re unfamiliar with it, local user accounts are created when the operating system is first installed, and they may have administrator permissions to run certain programs. Many users prefer local accounts due to the benefits they offer.
Despite Windows 11’s heavy reliance on Microsoft accounts, it still supports local accounts. Several methods are available to change the name of a local account in Windows 11.
From the Control Panel
The Control Panel is a handy tool that’s been around in Windows for a long time, and it’s still available in Windows 11. It lets you access various parts of your computer’s settings. Here’s how you can change your username using it.”
Here are the steps to change the account username from the Windows 11 Control Panel:
- Press the Windows key + S to open the Windows Search feature.
- Type “Control Panel” into the search bar and press Enter to open the Control Panel.
- Click on the “User Accounts” option in the Control Panel window.
- Next, click on “Change account name” from the options provided.
- Enter the new username you want to use for the account.
- Click on “Save changes” to apply the new username.
From Windows 11 Settings
The settings section in Windows 11 has been updated to offer more options for customizing the operating system and how it works. It now includes a dedicated area for managing user accounts, where you can change your account name.
Here’s how you can do it:
- Press the Windows + I keys together to open the Settings menu.
- Click on the “Accounts” section and select “Your info.”
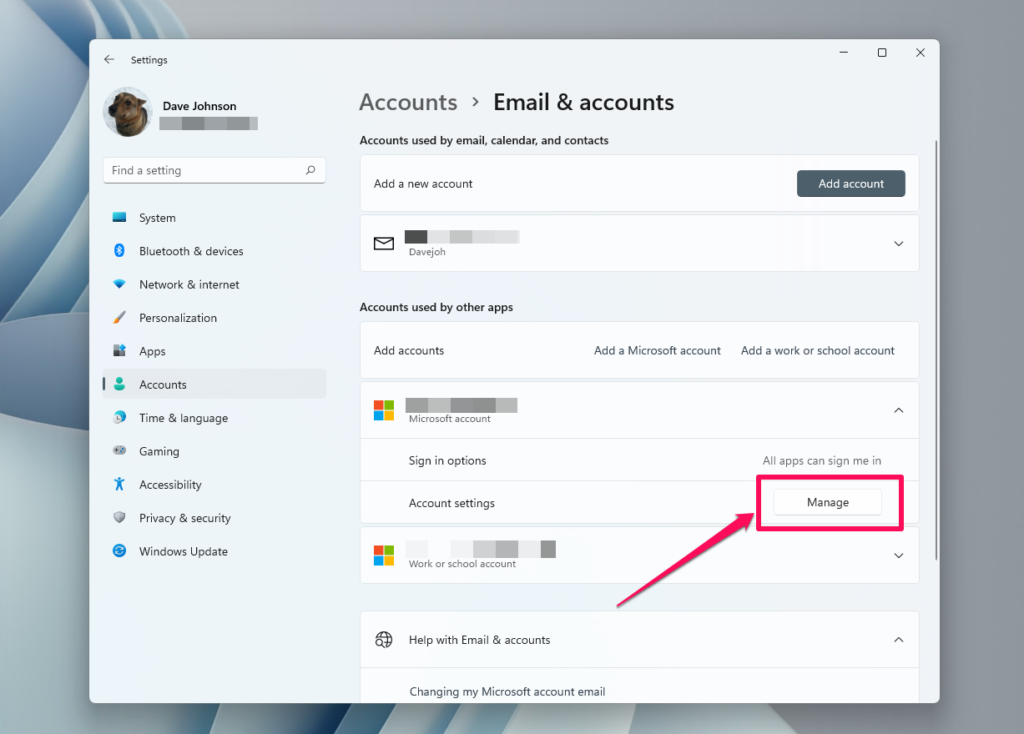
- Next, click on “Manage my Microsoft account” and follow the instructions provided by the wizard.
From the Command Prompt (CMD) in Windows 11
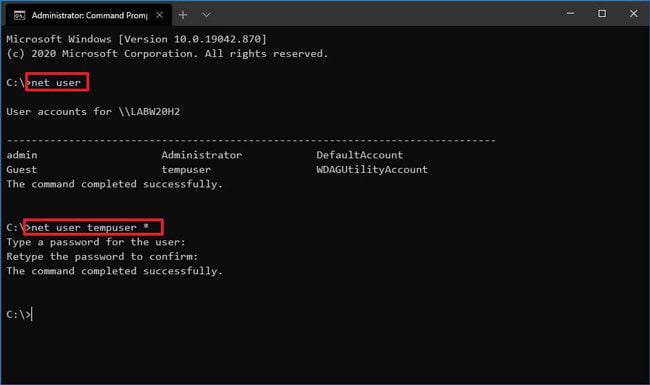
- Search for “Command Prompt” in the Windows search bar.
- Right-click on Command Prompt and select “Run as administrator” to open it with the necessary permissions.
- In the Command Prompt window, type the command “net user OLD_USERNAME NEW_USERNAME” (without the quotation marks), replacing OLD_USERNAME with the current username and NEW_USERNAME with the desired new username.
- Press Enter to execute the command and apply the changes.
How to change the username in Microsoft Account from Windows 11
Windows 11 forces you to use a Microsoft account instead of a regular local one. This way, you get all the cool cloud features and access to Microsoft’s programs.
But don’t worry; changing your Windows 11 Microsoft Account username is simple. Just follow these steps:
To change your username in a Microsoft Account on Windows 11, follow these easy steps:
- Open the Settings app in Windows 11.
- Click on the “Accounts” section, then select “Your info.”
- Look for the “Edit profile” option and click on it.
- In the “Full name” box, enter your new information.
- Save the changes, and you’re done!
If you don’t see the “Edit profile” section, click “Manage my accounts” and follow the steps. That’s it!


