

Random access memory (RAM) is a vital part of any computer. It holds data that the processor is currently using, and its speed plays a big role in how well your computer performs. One key aspect of RAM speed is its frequency, measured in megahertz (MHz).
Knowing your RAM frequency can be helpful for several reasons. If your computer runs slowly, you can check if your RAM performs at its expected speed. Additionally, it’s essential to know your RAM frequency if you plan to overclock your system.
This article will explain how to find your RAM frequency using various methods. We’ll also check into what RAM frequency is and why it matters.
Check RAM Frequency Using CMD:
Here is the guide to check RAM information using CMD:
- Basic RAM frequency check:
wmic memorychip get speedThis displays the speed of each RAM module in MHz.
- Detailed RAM information:
wmic memorychip get /allThis shows comprehensive details about your RAM, including capacity, manufacturer, and more.
- Specific RAM attributes:
wmic memorychip get capacity, speed, manufacturerYou can customize this command to show only the attributes you’re interested in.
- Total installed RAM:
wmic computersystem get totalphysicalmemoryThis shows the total physical memory in bytes.
- RAM usage information:
systeminfo | findstr /C:"Total Physical Memory" /C:"Available Physical Memory"This displays total and available physical memory.
Explanations and use cases:
- RAM Frequency: The speed shown is in MHz. Modern DDR4 RAM typically ranges from 2133 MHz to 3200 MHz or higher. Higher frequencies generally mean faster performance, but it’s not the only factor.
- Capacity: RAM capacity is usually displayed in bytes. To convert to GB, divide by 1,073,741,824 (1024^3).
- Manufacturer: This can be useful for troubleshooting or planning upgrades to ensure compatibility.
- Available vs Total Memory: This helps you understand how much of your RAM is currently used. If available memory is consistently low, you might benefit from adding more RAM.
- Multiple entries: If you see multiple speed or capacity entries, you have multiple RAM modules installed. They may have different specifications.
- Dual Channel: If you have two identical RAM modules, they may run in dual channel mode, improving performance. However, CMD doesn’t directly show this – you’d need to check in BIOS or use third-party software.
Remember that while CMD can provide much information, some details (like RAM timings) are inaccessible through these commands. You might need to use specialized software or check your system BIOS for more in-depth analysis.
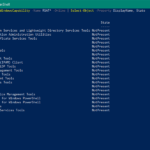
Check RAM frequency with Powershell:
In simple terms, you can use Windows Management Instrumentation (WMI) and Powershell to access pre-defined queries. This allows to work with the values in scripts or perform calculations. The specific command I use is “Get-WmiObject.”
But I can use a short one-liner if I only need to get information about the RAM modules. This one-liner displays details like the channel, slot, capacity (in bytes), and speed for each module.
Get-WmiObject -class "win32_physicalmemory" -namespace "rootCIMV2" | ft BankLabel, DeviceLocator, Capacity, SpeedQuery RAM frequency of all Windows devices
Since this is a common request, you can use this simple command to check the RAM module speed on any Windows computer, including physical servers. Note that for virtual machines, it will only show the capacity of the RAM.
Other values can also be output using the same query:
- Manufacturer = manufacturer of the RAM module
- SerialNumber = serial number of the module
- PartNumber = part number/article number of the manufacturer
For example, if you need the information to expand the main memory, this command should supply all the necessary parameters.
Get-WmiObject -class "win32_physicalmemory" -namespace "rootCIMV2" | fl BankLabel, DeviceLocator, Capacity, Manufacturer, Speed, SerialNumber, PartNumberCheck RAM frequency from remote computers.
The whole thing works remotely with the additional “-ComputerName“parameter on other computers. You can query information about the RAM of other Windows computers within seconds.
Get-WmiObject -ComputerName xxx -class "win32_physicalmemory" -namespace "rootCIMV2" | fl BankLabel, DeviceLocator, Capacity, Manufacturer, Speed, SerialNumber, PartNumberCheck RAM Details Using CPUZ
You can also use CPUZ, a popular tool, to check various hardware details for your system. This tool Lets you view CPU, GPU, and other hardware pieces of information, including RAM.
So here is a Step-by-step guide to check RAM information using CPU-Z:
- Go to the official CPU-Z website (https://www.cpuid.com/softwares/cpu-z.html)
- Download the appropriate version for your system
- Install the software
- Launch CPU-Z
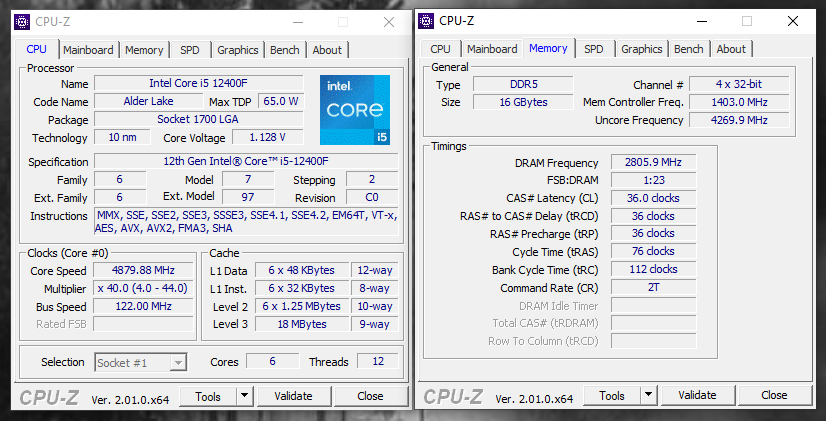
- Navigate to the “Memory” tab
- Read the RAM information:
- Frequency: Look for “DRAM Frequency” – this is half the effective speed
- Timings: Check the “Timings” section for CAS, RAS to CAS, RAS Precharge, etc.
- Size: “Size” shows the total installed RAM
- Type: “Type” indicates the RAM generation (e.g., DDR4)
- Channel #: Shows if you’re running single, dual, or quad-channel
- For more detailed module information, go to the “SPD” tab:
- Select each memory slot from the dropdown menu
- Check “Manufacturer,” “Part Number,” and other details
Key information and explanations:
- DRAM Frequency: CPU-Z shows the base clock. The effective speed is double this number for DDR (Double Data Rate) RAM. For example, if CPU-Z shows 1600 MHz, your effective speed is 3200 MHz.
- Timings: These numbers (e.g., 16-18-18-36) represent CAS Latency, RAS to CAS Delay, RAS Precharge, and Cycle Time, respectively. Lower numbers generally mean better performance.
- Channel Mode: Dual channel mode can significantly improve performance if supported by your motherboard and RAM configuration.
- XMP Profiles: In the “SPD” tab, you might see XMP (Extreme Memory Profile) information. This shows factory-set overclocking profiles that can be enabled in BIOS.
- Module Size and Rank: The “SPD” tab shows the size of each RAM module and whether it’s single or dual rank.
- Voltage: The standard voltage is listed, which is useful if you’re considering overclocking.
Advantages of using CPU-Z over CMD:
- More comprehensive and accurate information
- Real-time monitoring of frequency (useful for checking if XMP is active)
- Easier to read and interpret
- Provides information about XMP profiles and detailed timings
Remember, while CPU-Z provides extensive information, some settings (like enabling XMP) still need to be done in your system’s BIOS.
- How to Increase the RAM of an Android Phone
- How to tell if your RAM is failing in Windows 11
- Microsoft Edge will let you limit the browser’s RAM consumption


 is a vital part of any computer. It holds data that the processor is currently using, and its speed plays a big r)