
Sometimes, you must delete partitions pre-loaded on a newly purchased computer. If trying to remove them in Windows Disk Management does not work, DISKPART is a system tool that should do the trick.
DISKPART gives you lower-level control to repartition your drives how you want. I will explain the steps to use DISKPART to remove manufacturer partitions completely.
This will let you reformat the drive and set up your desired partition layout instead of using the one pre-configured on your device. DISKPART provides that degree of flexibility when the usual methods fail.
Delete default partitions
Hard drive makers often pre-partition USB drives to include an encryption option. This typically creates a small visible partition and a larger hidden, encrypted one. While convenient for some, other users may find this annoying or unnecessary. But trying to delete the partitions in Windows Disk Management fails, even with admin rights.
This is where the DISKPART command line tool can help. DISKPART comes with Windows and lets you reformat hard disks as needed.
To use DISKPART, open a PowerShell window or Command Prompt as administrator. Running with elevated rights is crucial for full disk access.
You can remove unwanted drive manufacturer partitions with the admin Command Prompt and the DISKPART tool. I’ll explain the steps next.
Important: Be sure to start as administrator (right mouse button -> “Run as administrator”).
Delete all partitions with Diskpart.
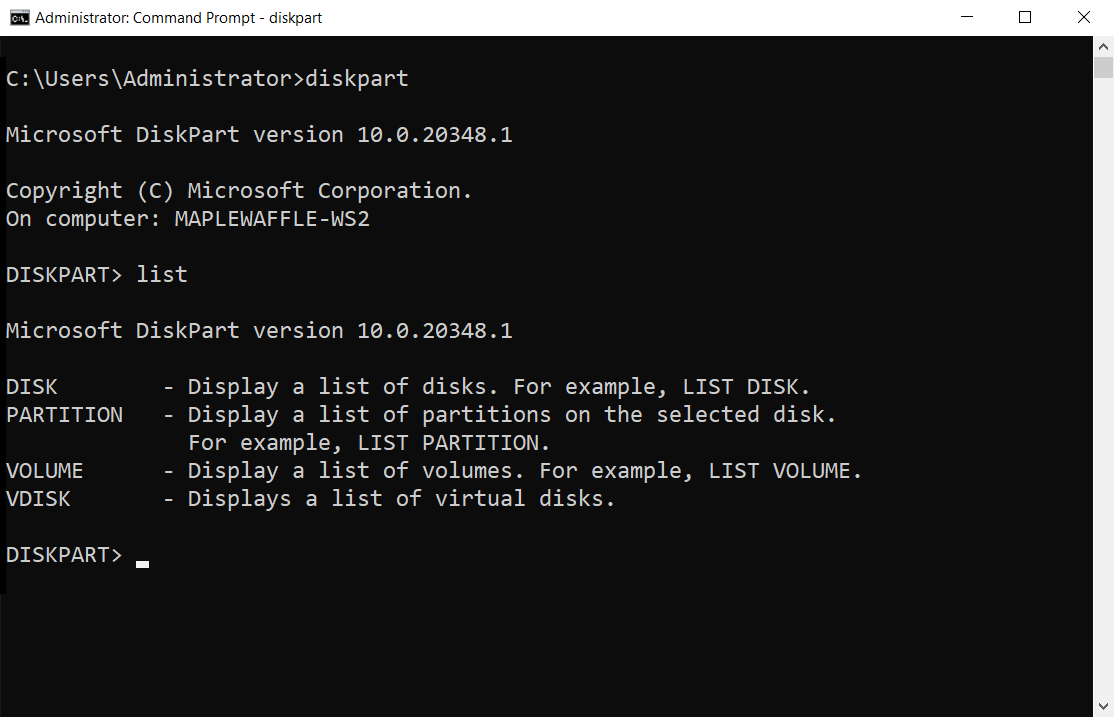
When you open Windows PowerShell, begin typing the “diskpart” command, which launches the Diskpart program. This will display information about the Diskpart version and the computer’s name. To view all connected hard drives (both internal and external),
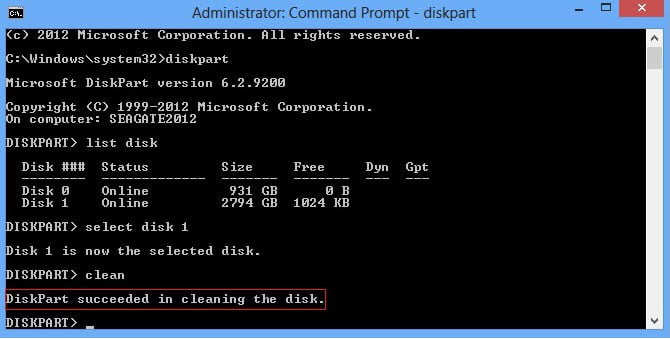
use the “list disk” command.
Be cautious and identify the specific data carrier you want to work with.
Now, use the “select disk 1” command to choose the hard drive you want to erase. Make sure to enter the correct number for your hard drive. To confirm your selection, use the “list disk” command; the corresponding line should now be marked with an asterisk.
To remove all partitions from the disk, enter the “clean” command. This action deletes all partitions and erases other information on the data carrier. Confirm the changes by using the “list disk” command.
After deleting partitions, you can initialize and reconfigure the disk. Use the Windows graphical interface – Disk Management (Windows key + X or diskmgmt. msc) – to reinitialize the deleted data carrier and partition it according to your preferences. If desired, you can continue using Diskpart for this process.
I created this guide because I frequently need to format a Laptop or PCs. I hope it helps someone else dealing with a similar task.
Delete pre-partitioned USB sticks?
Unfortunately, this approach doesn’t always work. If the manufacturer has written the configuration firmly into the firmware of a USB data carrier, there is no chance of removing the partitioning.


