

For Windows users, it’s essential to limit permissions to only the most necessary ones. To enhance security, administrators should restrict access to the command prompt.
In this article, I’ll explain how you can lock access to the command prompt.
Block access to CMD via group policy.
The command prompt (cmd.exe) remains a crucial tool for managing Microsoft Windows. It allows for quick system interventions and access to helpful information like serial numbers. However, it’s worth noting that regular Windows users can also open the command prompt.
To enhance security and prevent unauthorized access to the command prompt, it’s a good idea to deactivate it. You can achieve this by configuring group policies at the local level or for an entire domain.
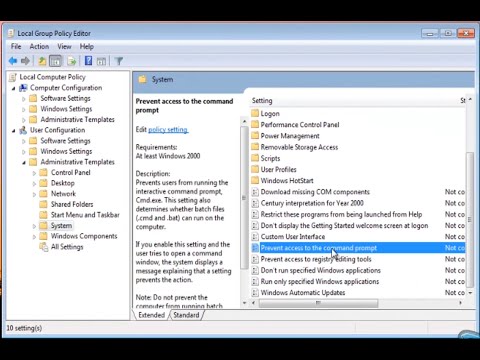
You can access the policy settings through the local group policy editor (gpedit.msc) or the Active Directory group policy management. Look for the specific policy setting here: [Policy Setting Location].
User Configuration -> Administrative Templates -> System >> Prevent access to command prompt.
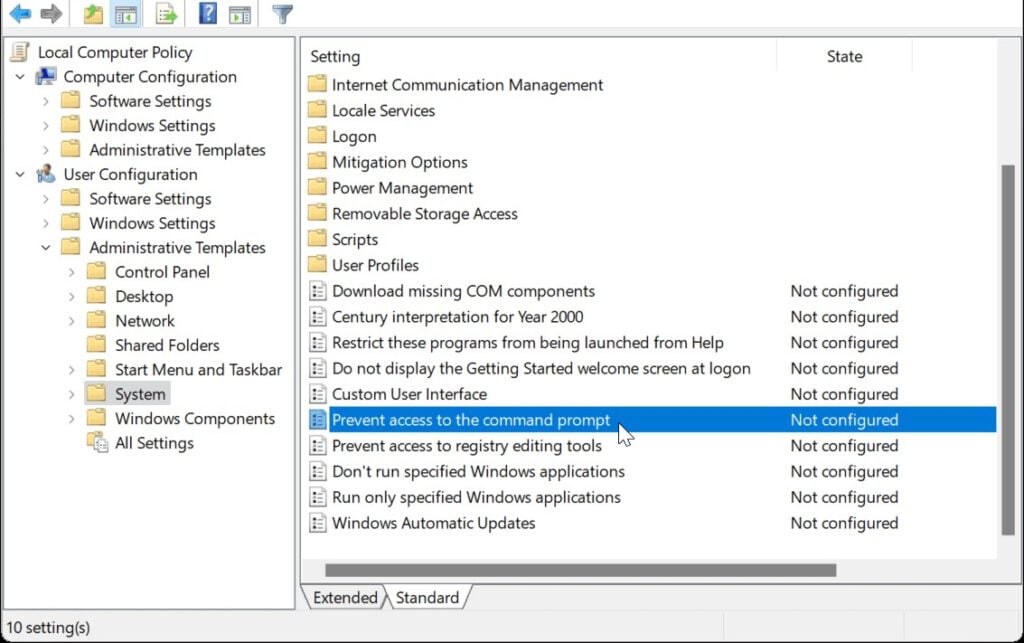
Open this policy and enable it. Optionally, you can also disable the execution of scripts. This means all executable script files with the extensions .bat and .cmd. This option should only be activated if no such scripts are used for administrative purposes. A typical example would be login scripts.
Suppose the policy has been activated and saved (“Ok”). In that case, the policy must only be reapplied in the corresponding user context (“gpupdate /force’ or re-login user), and access to the command prompt is prevented. From now on, the user only receives the message “The administrator has disabled the command prompt.”
While a non-admin user couldn’t break very much, I still find it reassuring when users are blocked from accessing the command prompt. And it puts a smile on the face of the “common admin” when Herr Spielratz from Accounting complains again about the completely exaggerated restrictions on authorizations.
Disable Command Prompt from the Windows Registry
Disabling the Command Prompt from the Windows Registry can be useful in certain situations, such as to prevent unauthorized users from accessing it. Please be aware that making changes to the Windows.
Registry can impact your system, so it’s essential to proceed cautiously. Follow these steps to disable the Command Prompt via the Windows Registry:
1. Open the Registry Editor:
- Press `Win + R` to open the “Run” dialog.
- Type “regedit” and press Enter. This will open the Windows Registry Editor.
2. Navigate to the Appropriate Registry Key:
- In the Registry Editor, navigate to the following
- key: HKEY_CURRENT_USER\Software\Policies\Microsoft\Windows\System
- If the “System” key does not exist under “Windows,” you may need to create it:
- Right-click on the “Windows” key.
- Select “New” and then “Key.”
- Name the new key “System.”
3. Create or Modify the DisableCMD Value:
- Inside the “System” key, right-click on the right-side pane.
- Choose “New” and then “DWORD (32-bit) Value.”
- Name the new DWORD value “DisableCMD.”
4. Set the Value Data:
- Double-click on the “DisableCMD” value.
- In the open dialog, set the “Value data” to “2” to disable the Command Prompt.
5. Save and Exit:
- Click “OK” to save the changes.
- Close the Registry Editor.
6. Restart Your Computer:
- To apply the changes, it’s advisable to restart your computer.
After restarting, the Command Prompt should be disabled. If you wish to re-enable it, you can return to the Registry Editor and change the “DisableCMD” value to “0” or delete it. Always be cautious when making changes in the Windows Registry, and back up your data before proceeding if necessary.


