
PowerShell scripts are a powerful tool that can significantly simplify the administration of Windows servers and clients. In this article, I will guide you through running a PowerShell script using the task scheduler in Microsoft Windows, enabling you to automate various administrative tasks efficiently.
Utilizing the task scheduler allows you to set up scheduled execution of your PowerShell scripts, eliminating the need for manual intervention. This automation can save you time and effort, allowing you to focus on other critical aspects of system management.
Whether you want to perform regular maintenance tasks, deploy software updates, or execute complex system configurations, running PowerShell scripts via the task scheduler will empower you to automate these processes effectively.
Run PowerShell script with Task Scheduler.
Task Scheduler is a powerful tool in Windows that allows you to automate tasks on your computer. If you frequently work with PowerShell scripts and want to schedule their execution at specific times or events, Task Scheduler can be a valuable resource.
In this comprehensive guide, we will walk you through the step-by-step process of setting up Task Scheduler to execute PowerShell scripts, enabling you to automate your administrative tasks and streamline your workflow. Let’s dive in!
1: Prepare Your PowerShell Script
Before configuring Task Scheduler, ensure you have a PowerShell script ready for execution. The script should be thoroughly tested and contain the necessary logic to perform the desired actions on your system.
2: Open Task Scheduler
To launch Task Scheduler, press the Windows key, type “Task Scheduler,” and select the appropriate option from the search results. Task Scheduler’s interface will open, displaying the Task Scheduler Library.
3: Create a New Task
In the Task Scheduler Library, right-click on a space and select “Create Task.” A new “Create Task” window, comprising various tabs and settings, will appear.
4: Configure the General Settings
In the “General” tab of the “Create Task” window, provide a name and description for your task. Ensure that the selected security options are appropriate for your needs.
5: Set Triggers
In the “Triggers” tab, specify the conditions that will trigger the execution of your PowerShell script. You can choose from various options such as a specific time, daily, weekly, or even on system startup.
6: Define the Action
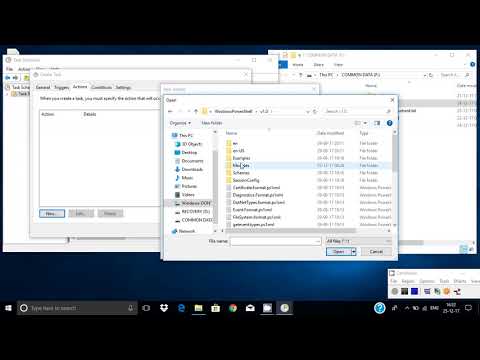
In the “Actions” tab, click on “New” to define the action that will be executed. Select “Start a program” as the action type. In the “Program/script” field, browse for and select the PowerShell executable (typically located at C:\Windows\System32\WindowsPowerShell\v1.0\powershell.exe).
7: Add Arguments and Start in Path
In the “Add arguments” field, specify the arguments required to run your PowerShell script. For example, if your script is named “myscript.ps1” and located in “C:\Scripts,” you would enter `-ExecutionPolicy Bypass -File “C:\Scripts\myscript.ps1″`. In the “Start in” field, provide the path to the folder containing your script (e.g., “C:\Scripts”).
8: Configure Additional Settings (Optional)
If needed, you can customize additional settings in other tabs, such as “Conditions” to specify power or network conditions, “Settings” for task behavior options, or “History” to track task execution.
9: Save and Test Your Task
Once configured all the necessary settings, click “OK” to save your task. You can then test the task by right-clicking on it in the Task Scheduler Library and selecting “Run.” Verify that your PowerShell script executes as expected.
10: Monitor and Manage Your Scheduled Task
To monitor the execution of your scheduled task or make any changes, access Task Scheduler Library, locate your task and make the necessary adjustments or view its history.
Conclusion:
By leveraging the capabilities of Task Scheduler in Windows, you can automate the execution of PowerShell scripts effortlessly. This step-by-step guide has provided you with the knowledge and instructions to configure Task Scheduler and schedule the execution of your PowerShell scripts.
Automating administrative tasks through scheduled PowerShell scripts can save you time, enhance productivity, and simplify complex operations on your Windows system. Start leveraging the power of Task Scheduler today and streamline your workflow with automated PowerShell script execution.


