

One of the notable changes announced for Windows 11 with the 23H2 update in both its Pro and Home versions was the automatic encryption of devices. This means that when setting up your computer for the first time, encryption would be enabled by default to safeguard your data.
Interestingly, Microsoft appears to have already activated this feature on computers running the Windows 11 24H2 RTM version, as colleagues at Windows Latest reported. Moreover, there’s a possibility that later this year, in 2024, this feature will be enabled for all users.
Windows 11 will have automatic BitLocker encryption by default
BitLocker is one of Microsoft’s top tools, and it is seamlessly integrated into its operating system. It’s responsible for encrypting and safeguarding your computer’s storage devices and any external devices you connect. This ensures that your data remains private and protected from prying eyes.
As mentioned, Microsoft recently activated the automatic encryption feature with BitLocker on computers running the Windows 11 24H2 RTM version. This means that users with this version now benefit from added protection.
Moreover, Microsoft has changed the requirements needed to activate this feature. They’ve removed the need for Modern Standby/HSTI commit and untrusted DMA ports. This simplifies the process, allowing computers to update to Windows 11 and enable this function by default without encountering as many hurdles.
However, it’s crucial to remember that data encryption with BitLocker requires a unique password to unlock the content. Losing this password could lead to difficulties accessing encrypted devices, especially during system resets or reinstallations.
Therefore, keeping track of and safeguarding your recovery password is essential to avoid losing access to your encrypted devices.
Disable automatic Windows 11 encryption during installation
If you’re reinstalling or installing Windows 11 from scratch, it’s crucial to understand how to disable BitLocker, the feature designed to protect your information. While it’s excellent for safeguarding your data, disabling it is necessary to avoid the risk of losing access to your devices.
- Press the key combination Shift+F10 during installation, and a CMD window will open.
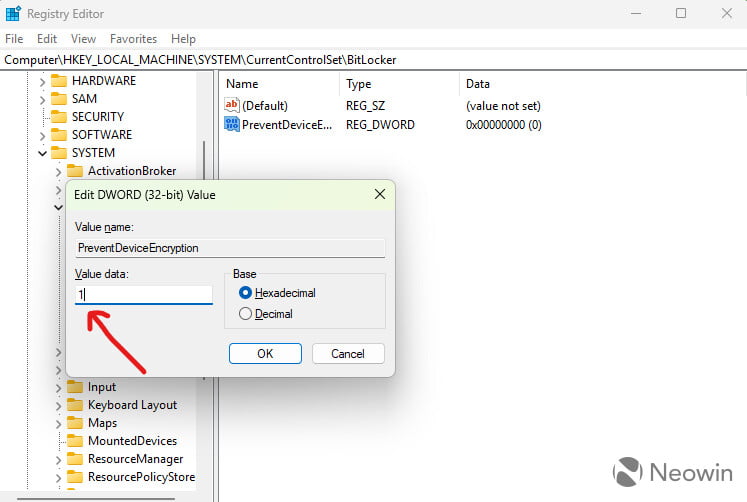
- You must enter the command regedit and press Enter to access the Registry Editor.
- Then, navigate between the folders until you reach the path “HKEY_LOCAL_MACHINE\SYSTEM\CurrentControlSet\Control\BitLocker,” without quotes.
- Right-click on the right side of this folder and select New Dword value (32 bits).
- Now, you must name it «PreventDeviceEncryption«without the quotes.
- You assign the value 1 and click on Accept.
- Then you close the Registry Editor, and this will be all.


